Feature Update: NPS survey position
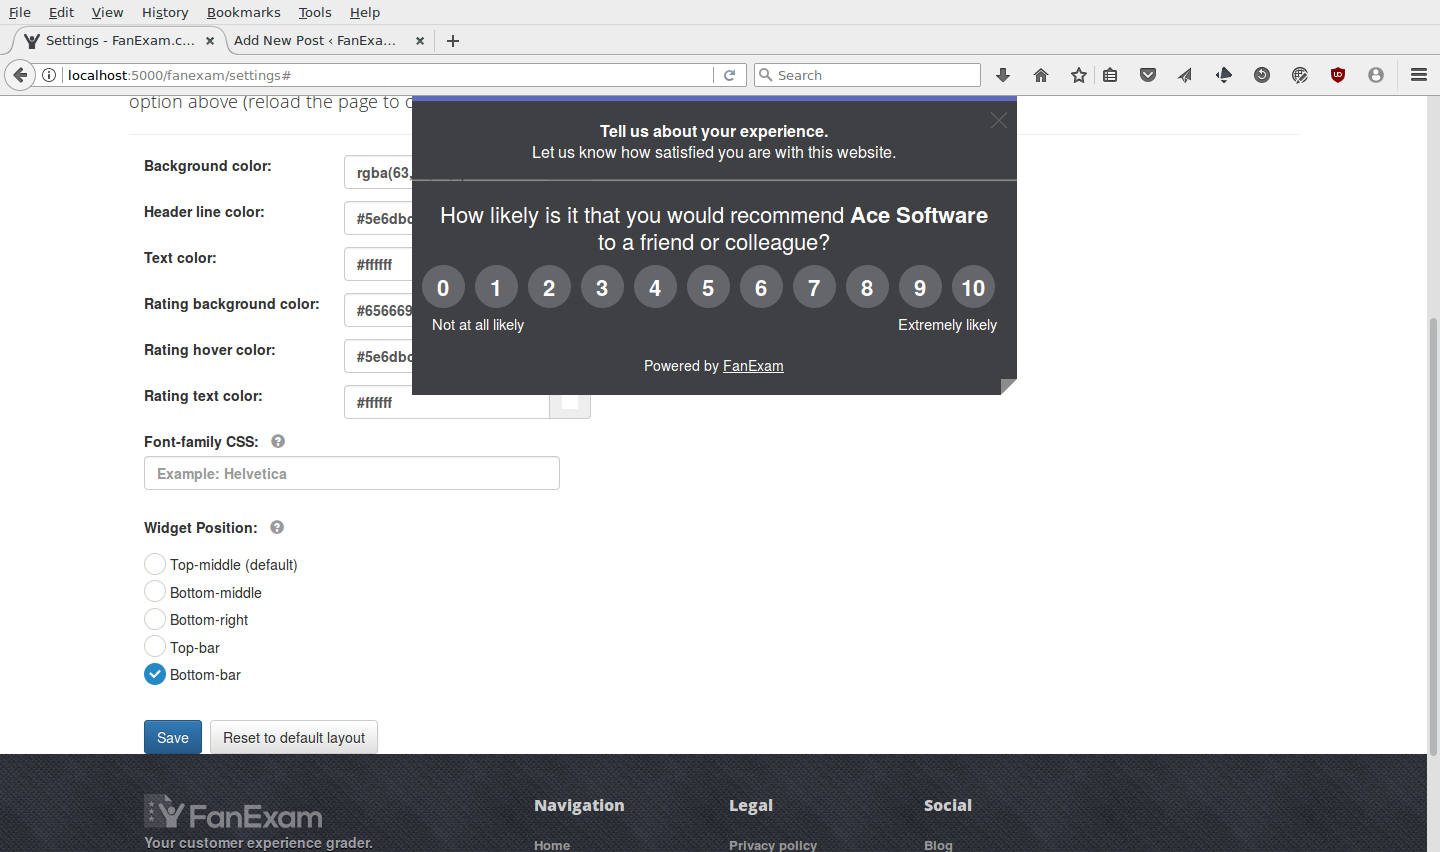
With FanExam you can choose an optimal NPS survey position to get high response rates. NPS survey design influences response rates and user experience. Have you ever wondered why the FanExam NPS survey position is in the top-middle of a webpage? We have! The top-middle position was chosen because tests revealed that this results in very good response rates.

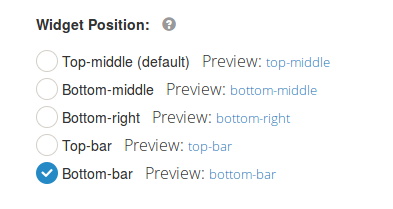
With increasing use of FanExam in different applications, ranging from Software as a Service (SaaS) to websites, hotel booking sites and software testing sites, we have learned that a one size fits all approach does not work. The result is an updated settings page. The new options under Survey Design let you preview and select different NPS survey positions.How to choose a NPS survey position
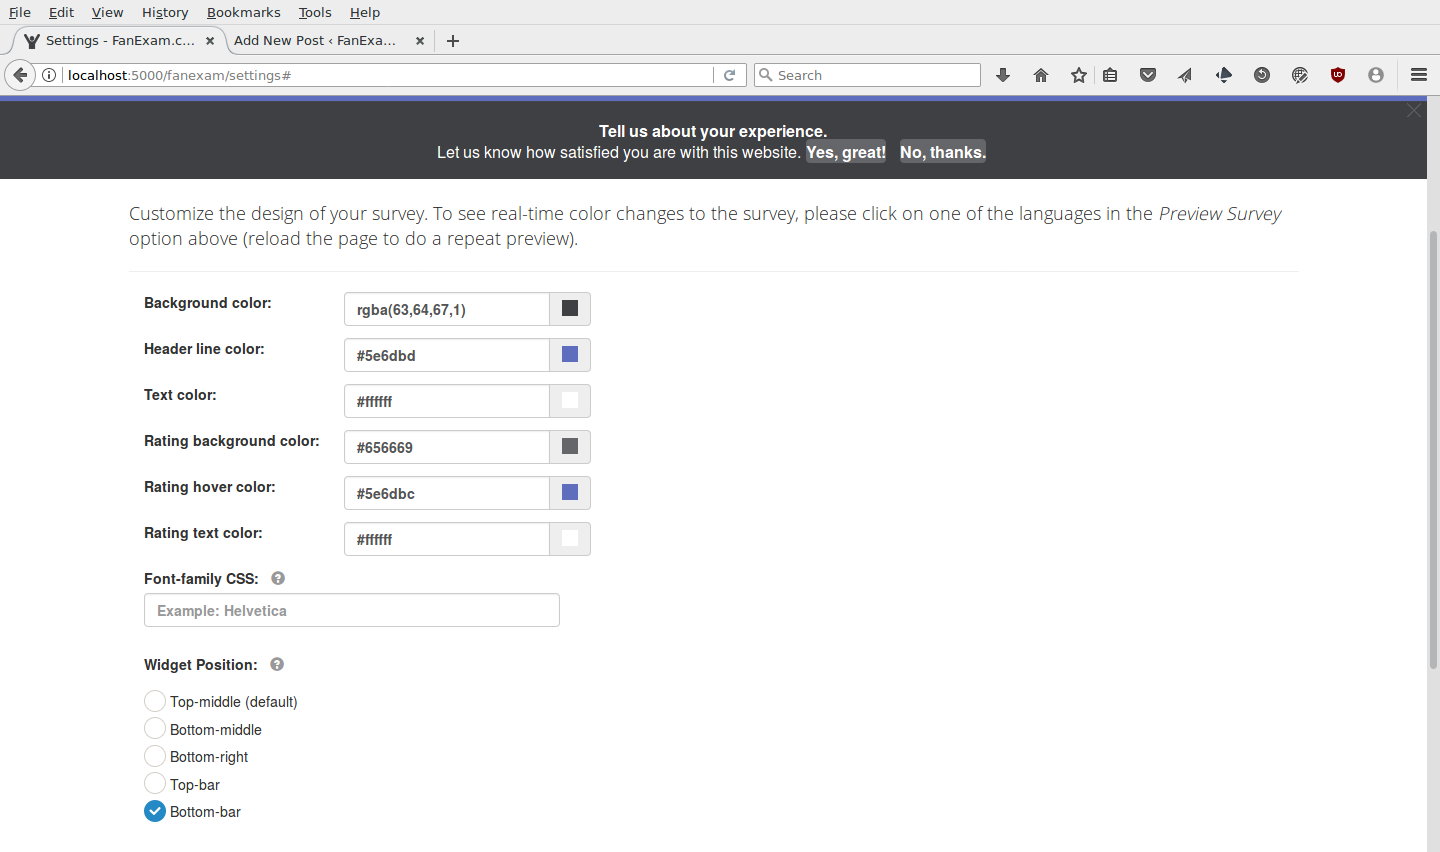
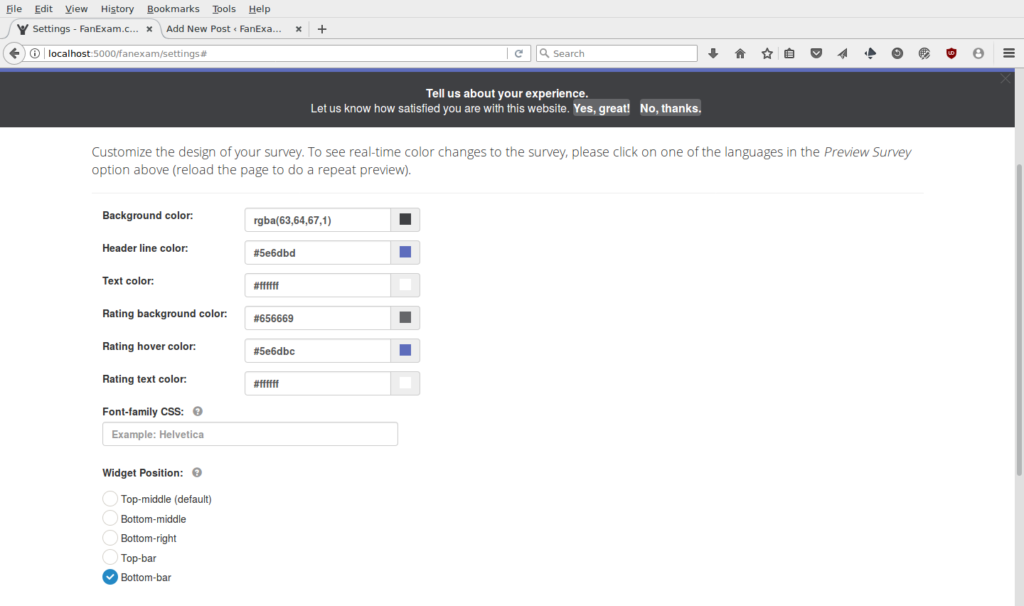
Some of our customers are using FanExam as an internal tool to measure feedback. Some users may see the FanExam survey multiple times because of specific setup and testing requirements. In this use case response rates are still important, but also user experience is increasingly important. We have added the option to show the survey as a top or bottom bar:
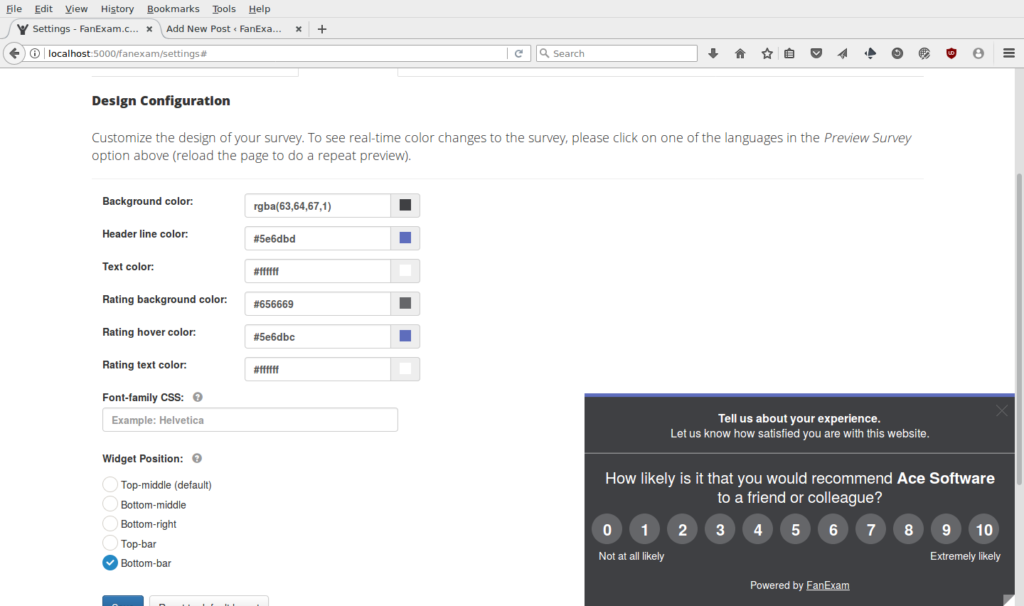
Or in the lower right corner:
NPS survey recommendation
We still recommend to start with the default top middle NPS survey option. This option ensures the highest response rates and thus the highest representativeness of your survey.
How to set the NPS survey position
Go to the FanExam Settings page, choose Survey Design and select a position.
Feature update: Anonymize IP for NPS responses
FanExam can anonymize the IP address of NPS survey responses. You might wonder why this is necessary? In short, some of our commercial customers in the EU have strict privacy policies. For example, some customers don’t collect personally identifiable information when using FanExam. For these customers the anonymize IP option is available.
The anonymize IP option is mandatory for specific use cases, as some countries interpret personally identifiable information among other as the IP address of the computer or device from which the FanExam response was submitted (the IP address is basically a unique identifier for a specific device, similar to a telephone number, see https://en.wikipedia.org/wiki/IP_address ).
How to set the “anonymize IP” option
If you need to anonymize the IP address, open the FanExam settings page, go to the Settings page , search for “Anonymize the IP address of collected responses:” and set to “On” or “Off”.
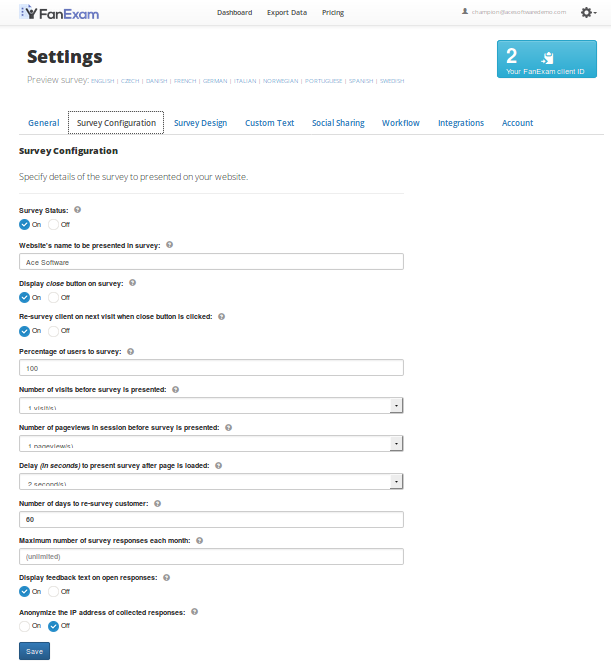
This anonymize IP setting takes effect immediately for all newly collected responses.
How to integrate NPS and SEO with Google Analytics
The Net Promoter Score (NPS) is a simple and surprisingly effective method to get actionable customer feedback. This customer feedback can in turn drive your SEO -Search Engine Optimization and deliver more focused traffic to your website. The main method to get information on your website visitors is Google Analytics. SeoHighLighter is a tool to combine NPS and SEO. In effect your SEO score is driven by the questions and search terms your visitors put into Google, in combination with the content on your website. Once you know the questions and search terms your visitors use, you can answer the questions directly on your website copy and help your visitors. When you start collecting NPS and open text feedback from your visitors, you uncover the language of your customers. The language of your customers are the terms and phrases they use to find your website and express their thoughts about your website.
How to integrate NPS and SEO with Google Analytics
In this post we show an effective, yet simple method using SeoHighLighter to integrate NPS and SEO. First, you need to open an account with FanExam here. Then you need to connect SeoHighLighter. SeoHighLighter is a service to make Google Analytics easy to understand and actionable through dashboards. We use FanExam for collecting NPS and open text responses. Thanks to the integration of Google Analytics and FanExam on the one end, and SeoHighLighter on the other end, your NPS scores will automatically appear in the SeoHighLighter dashboard.
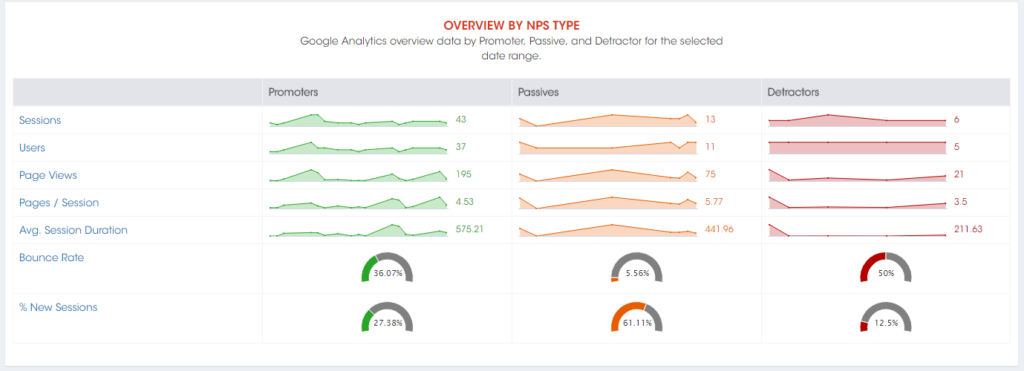
The SeoHighLighter dashboard with NPS The FanExam dashboard shows your rating and the open feedback responses.
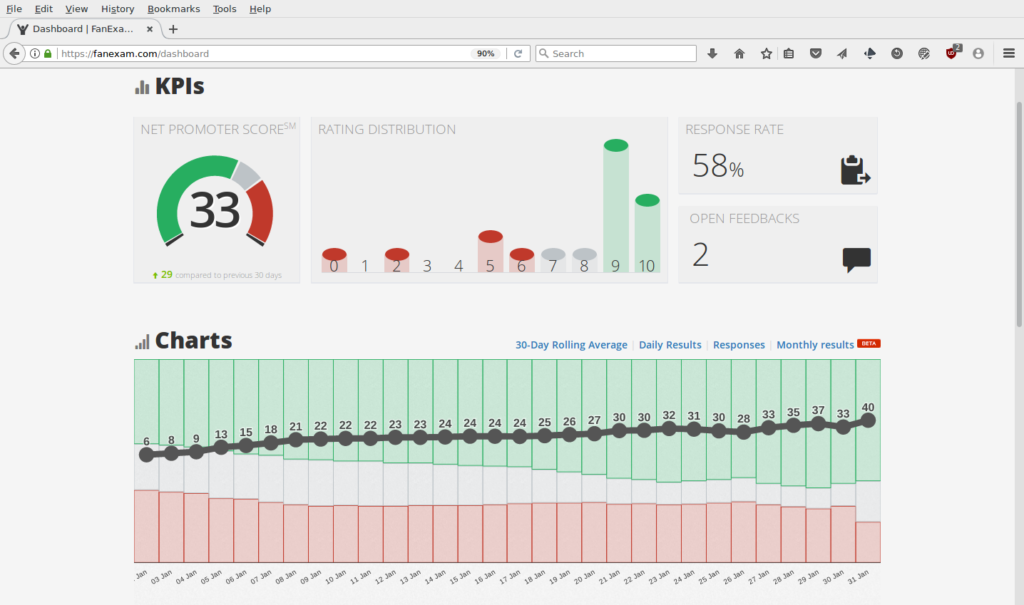
The Fanexam dashboard FanExam sends your NPS feedback directly into Google Analytics. SeoHighLighter then automatically picks up the NPS scores from Google Analytics and directly shows them in a dashboard.
How to set up SeoHighLighter with FanExam in 4 simple steps:
- Put Google Analytics on your site.
- Install FanExam and follow the Google Analytics integration steps.
- Activate the Google Analytics integration in the FanExam dashboard.
- Open an account with SeoHighLighter.
Done! SeoHighLighter will auto detect the FanExam data in Google Analytics. Reporting starts automatically when data becomes available.
Why is this a good idea?
The combination of SeoHighLighter and FanExam is a low effort – high reward strategy to combine website data with customer feedback. You can correlate visitor behavior with the language of your visitors and improve SEO by adjusting your website to what your visitors are looking for. Start with your FanExam account here.
How to collect NPS on a WordPress site
This post explains how to set up a Net Promoter Score survey on WordPress. Starting to collect NPS on WordPress is simple and free.
Setting up the FanExam Net Promoter Score survey on a WordPress site is simple:
- Install the WordPress plugin Scripts n Styles
- Open a Fanexam account at FanExam Create Account
- Copy the FanExam snippet from the tag page
- Insert the FanExam tag in the WordPress backend on the scripts-n-styles plugin settings page
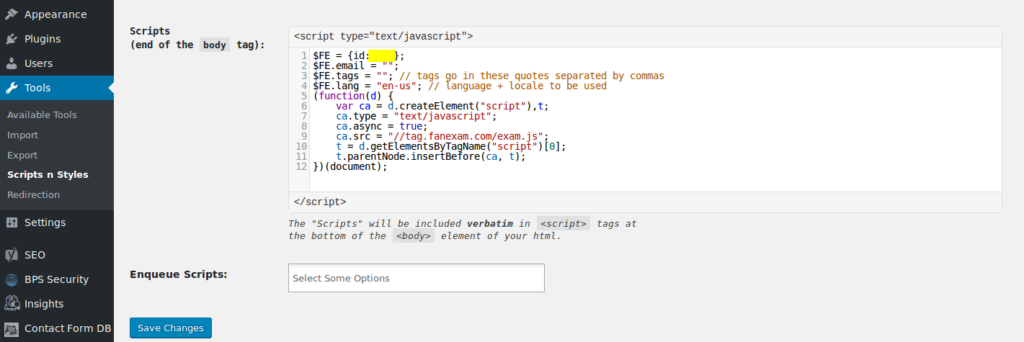
- Save the settings page
- Tweak the FanExam settings page. On a website or blog it is recommended to start with the following settings for the NPS widget: survey visitors on the first or second visit, after 2 or 3 pageviews, and with a 10 second delay.
- Experiment with the settings. There is no magic bullet, as the settings depend on your audience.
Tip: Adjust the settings when you show the NPS survey after you have observed NPS responses for a period of a few weeks. For some sites it makes sense to show the NPS survey only to repeat visitors, whereas on other sites it makes sense to show the survey on the first visit and the third pageview. This will give the best NPS experience for WordPress sites.
Net Promoter Score in Google Tag Manager
 Google Tag Manager (GTM) is a free tool that makes it easy for marketers to add and update website tags — including conversion tracking, site analytics, remarketing, and more—with just a few clicks, and without needing to edit your website code.
If your site uses GTM, you can easily deploy FanExam. You can also bring Net Promoter Scoresm (NPS®) data from FanExam to the GTM data layer and use this information in all tools and applications deployed by the tag manager. Open your FanExam account here.
How to deploy FanExam from Google Tag Manager
To implement the FanExam Javascript tag on your website via GTM, follow these steps:
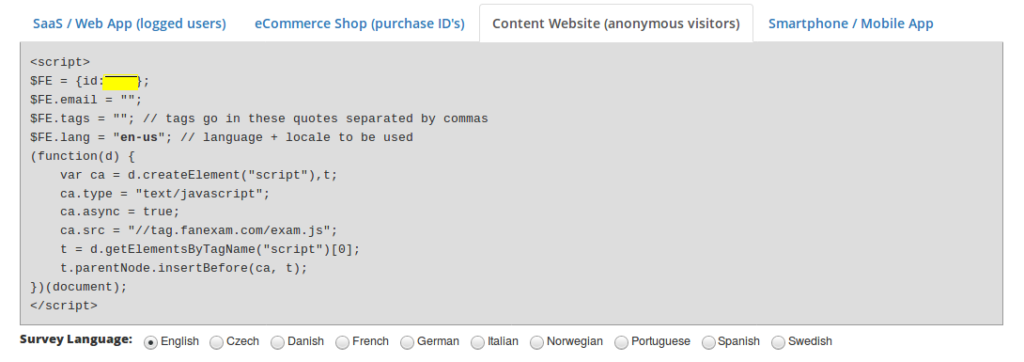
- Copy the FanExam JavaScript snippet from the Embed Code section of your FanExam account.
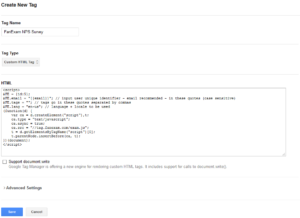
- In your GTM account, create a new Tag and input the name
FanExam NPS Surveyas the Tag Name. - Select Custom HTML Tag from the Tag Type dropdown.
- Paste the FanExam code you copied from Step 1 into the HTML input box.
- Based on your site type that you configured in the FanExam Settings, you may have to apply some changes to this tag:
- Web App (SaaS): Search for the $FE.email parameter, and for it’s value input the client’s user email address from the data layer (or you can use your own primary key), for example:
$FE.email = "{{email}}"; - eCommerce Shop: Search for the $FE.email parameter, and for it’s value input the the purchase ID, for example:
$FE.email = "{{purchase_id}}"; - Content website (Blog): No changes are necessary.
- Web App (SaaS): Search for the $FE.email parameter, and for it’s value input the client’s user email address from the data layer (or you can use your own primary key), for example:
- Under Firing Rules we recommend calling the FanExam Survey in special occarions based on your site type. You can either use GTM to strategically summon the NPS survey or use the FanExam Settings to configure visit and pageview frequency control. Here are some observations about the firing rules for each type of site:
 Web App (SaaS): Do make sure to summon the tag only when the user is logged in. We recommend calling this tag within a dashboard and preferably after the user has engaged with your product a couple of times.
- eCommerce Shop: The tag should be installed in the purchase confirmation page of your online store – so that you can validate the entire purchase process with your client.
- Content website (Blog): The tag can be summoned on any page – so you can use the All pages option, but we do recommend to let your readers engage with your site before presenting the survey. FanExam Settings allows you to configure a minimum number of pageviews a user must have seen and/or a minimum number of seconds the user must have spent on a page before summoning the survey.
- Click the Save button to add the new tag.
- Click the Publish button to publish these changes.
How to send FanExam results into GTM’s data layer
FanExam supports automatic NPS data push to the GTM data layer. Just turn on the Google Tag Manager integration in the FanExam integration settings for NPS ratings to be posted to the GTM data layer. The information structure posted to the data layer is described below:
Data layer object NPS_FanExamNPS_FanExam.Rating: the NPS rating for that user, from 0 to 10NPS_FanExam.Customer_Type: the customer type: Promoter, Passive or DetractorGoogle Tag Manager macros & rules
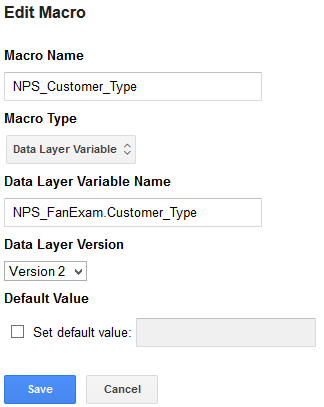
We recommend creating two macros to be used from the FanExam NPS data:
NPS_RatingandNPS_Customer_Type, and one rule:FanExam Survey Response. You can then use these macros and rules to easily send NPS data from the data layer to other applications and services.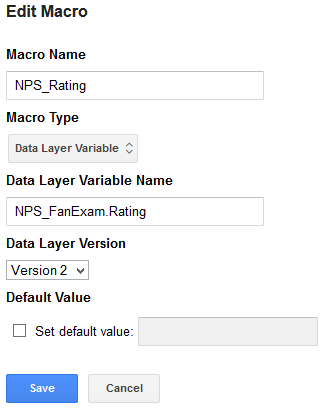
For the GTM rule, create a new Rule and use these parameters:
- Rule Name: Input
FanExam NPS Response. - Condition: Select the {{event}} from the first combo box, then choose equals from the second pulldown – and then input
NPS_FanExamin the last text box.
Don’t forget to publish these changes.
Posting FanExam data to Google Analytics in GTM
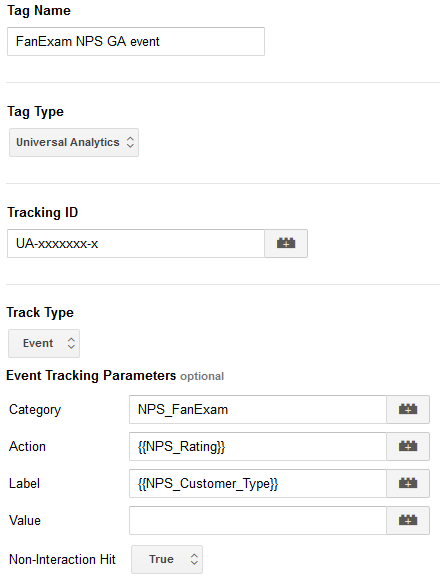 Ok, let the magic begin. Let’s see an example of how to push NPS data from FanExam into Google Analytics (Universal Analytics tag). First, create a new Tag with the following configuration:
- Tag Name:
FanExam NPS GA event - Tag Type:
Google Analytics >> Universal Analytics - Tracking ID:
(your UA tracking ID) - Track Type:
Event - Event Tracking Parameters:
- Category:
NPS_FanExam - Action:
{{NPS_Rating}} - Label:
{{NPS_Customer_Type}}
- Category:
- Non-Interaction Hit:
True
If you want to create a Custom Dimension for NPS data in Google Analytics (highly recommended), follow the steps below before adding the tag:
- Expand the More Settings option.
- Expand the Custom Dimensions option.
- Open a new browser window, login to Google Analytics and create a new custom dimension (instructions here, see step 3).
- Select the index you created in Step 3, and under Dimension input
{{NPS_Rating}}.
Click on Save and you’re done. Learn more on how NPS data in Google Analytics can help benefit your website with our Net Promoter Score for Google Analytics blog post.
Other ideas for GTM + FanExam
Now that you have access to NPS ratings in the data layer with Google Tag Manager – you can use this information at will. You can now send NPS data to chat widgets or even summon custom scripts based on the response (maybe a testimonial from Promoters?). Do make sure to use the NPS data across your website ecosystem. Another interesting use with GTM is to bring data into FanExam. You can add demographic information, plan data, or any other tidbit of information you have from the data layer into the FanExam tags and use this data to segment information in the FanExam reporting interface.