![]() Google Tag Manager (GTM) is a free tool that makes it easy for marketers to add and update website tags — including conversion tracking, site analytics, remarketing, and more—with just a few clicks, and without needing to edit your website code.
Google Tag Manager (GTM) is a free tool that makes it easy for marketers to add and update website tags — including conversion tracking, site analytics, remarketing, and more—with just a few clicks, and without needing to edit your website code.
If your site uses GTM, you can easily deploy FanExam. You can also bring Net Promoter Scoresm (NPS®) data from FanExam to the GTM data layer and use this information in all tools and applications deployed by the tag manager. Open your FanExam account here.
How to deploy FanExam from Google Tag Manager
To implement the FanExam Javascript tag on your website via GTM, follow these steps:
- Copy the FanExam JavaScript snippet from the Embed Code section of your FanExam account.
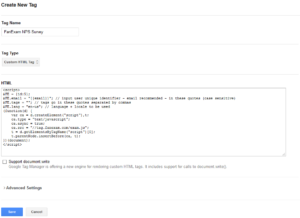
- In your GTM account, create a new Tag and input the name
FanExam NPS Surveyas the Tag Name. - Select Custom HTML Tag from the Tag Type dropdown.
- Paste the FanExam code you copied from Step 1 into the HTML input box.
- Based on your site type that you configured in the FanExam Settings, you may have to apply some changes to this tag:
- Web App (SaaS): Search for the $FE.email parameter, and for it’s value input the client’s user email address from the data layer (or you can use your own primary key), for example:
$FE.email = "{{email}}"; - eCommerce Shop: Search for the $FE.email parameter, and for it’s value input the the purchase ID, for example:
$FE.email = "{{purchase_id}}"; - Content website (Blog): No changes are necessary.
- Web App (SaaS): Search for the $FE.email parameter, and for it’s value input the client’s user email address from the data layer (or you can use your own primary key), for example:
- Under Firing Rules we recommend calling the FanExam Survey in special occarions based on your site type. You can either use GTM to strategically summon the NPS survey or use the FanExam Settings to configure visit and pageview frequency control. Here are some observations about the firing rules for each type of site:
 Web App (SaaS): Do make sure to summon the tag only when the user is logged in. We recommend calling this tag within a dashboard and preferably after the user has engaged with your product a couple of times.
- eCommerce Shop: The tag should be installed in the purchase confirmation page of your online store – so that you can validate the entire purchase process with your client.
- Content website (Blog): The tag can be summoned on any page – so you can use the All pages option, but we do recommend to let your readers engage with your site before presenting the survey. FanExam Settings allows you to configure a minimum number of pageviews a user must have seen and/or a minimum number of seconds the user must have spent on a page before summoning the survey.
- Click the Save button to add the new tag.
- Click the Publish button to publish these changes.

How to send FanExam results into GTM’s data layer
FanExam supports automatic NPS data push to the GTM data layer. Just turn on the Google Tag Manager integration in the FanExam integration settings for NPS ratings to be posted to the GTM data layer. The information structure posted to the data layer is described below:
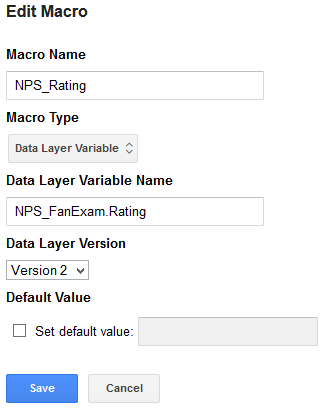
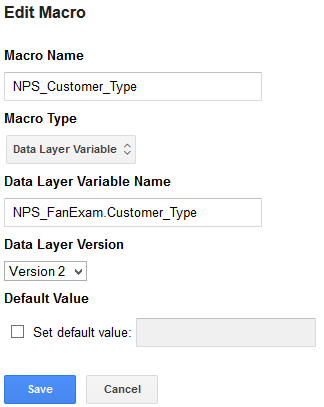
Data layer object NPS_FanExamNPS_FanExam.Rating: the NPS rating for that user, from 0 to 10NPS_FanExam.Customer_Type: the customer type: Promoter, Passive or Detractor
Google Tag Manager macros & rules
We recommend creating two macros to be used from the FanExam NPS data: NPS_Rating and NPS_Customer_Type, and one rule: FanExam Survey Response. You can then use these macros and rules to easily send NPS data from the data layer to other applications and services.
 |
 |
For the GTM rule, create a new Rule and use these parameters:
- Rule Name: Input
FanExam NPS Response. - Condition: Select the {{event}} from the first combo box, then choose equals from the second pulldown – and then input
NPS_FanExamin the last text box.
Don’t forget to publish these changes.
Posting FanExam data to Google Analytics in GTM
 Ok, let the magic begin. Let’s see an example of how to push NPS data from FanExam into Google Analytics (Universal Analytics tag). First, create a new Tag with the following configuration:
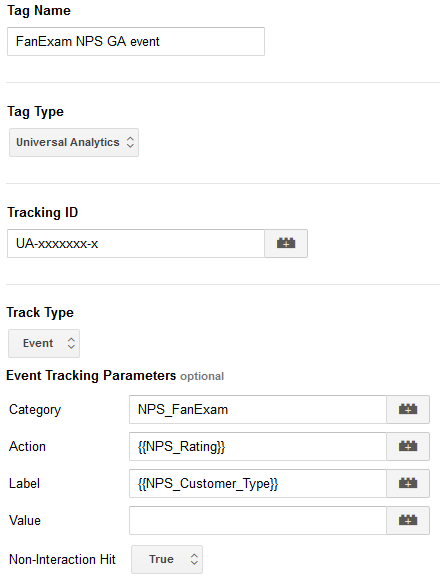
- Tag Name:
FanExam NPS GA event - Tag Type:
Google Analytics >> Universal Analytics - Tracking ID:
(your UA tracking ID) - Track Type:
Event - Event Tracking Parameters:
- Category:
NPS_FanExam - Action:
{{NPS_Rating}} - Label:
{{NPS_Customer_Type}}
- Category:
- Non-Interaction Hit:
True
If you want to create a Custom Dimension for NPS data in Google Analytics (highly recommended), follow the steps below before adding the tag:
- Expand the More Settings option.
- Expand the Custom Dimensions option.
- Open a new browser window, login to Google Analytics and create a new custom dimension (instructions here, see step 3).
- Select the index you created in Step 3, and under Dimension input
{{NPS_Rating}}.
Click on Save and you’re done. Learn more on how NPS data in Google Analytics can help benefit your website with our Net Promoter Score for Google Analytics blog post.
Other ideas for GTM + FanExam
Now that you have access to NPS ratings in the data layer with Google Tag Manager – you can use this information at will. You can now send NPS data to chat widgets or even summon custom scripts based on the response (maybe a testimonial from Promoters?). Do make sure to use the NPS data across your website ecosystem. Another interesting use with GTM is to bring data into FanExam. You can add demographic information, plan data, or any other tidbit of information you have from the data layer into the FanExam tags and use this data to segment information in the FanExam reporting interface.